Wood Deck Construction Phases: From Footings to Boards, Step by Step
If you are collecting wood deck ideas and trying to figure out what actually happens between signing a contract and standing on finished deck boards, this walkthrough is for you. Most inspiration galleries show you the end result and skip the part that determines whether your deck lasts 10 years or 25: the construction itself. Here is how a wood deck goes together in Ontario, California, phase by phase, from the first footing hole to the last board, written the way a local deck builder would explain it over the phone.
This matters whether you are a first-time deck planner budgeting a new backyard project or a home-seller whose inspector just flagged a sagging frame. Once you understand the phases, you can read a quote intelligently, ask sharper questions, and spot corners being cut before they are buried under decking.
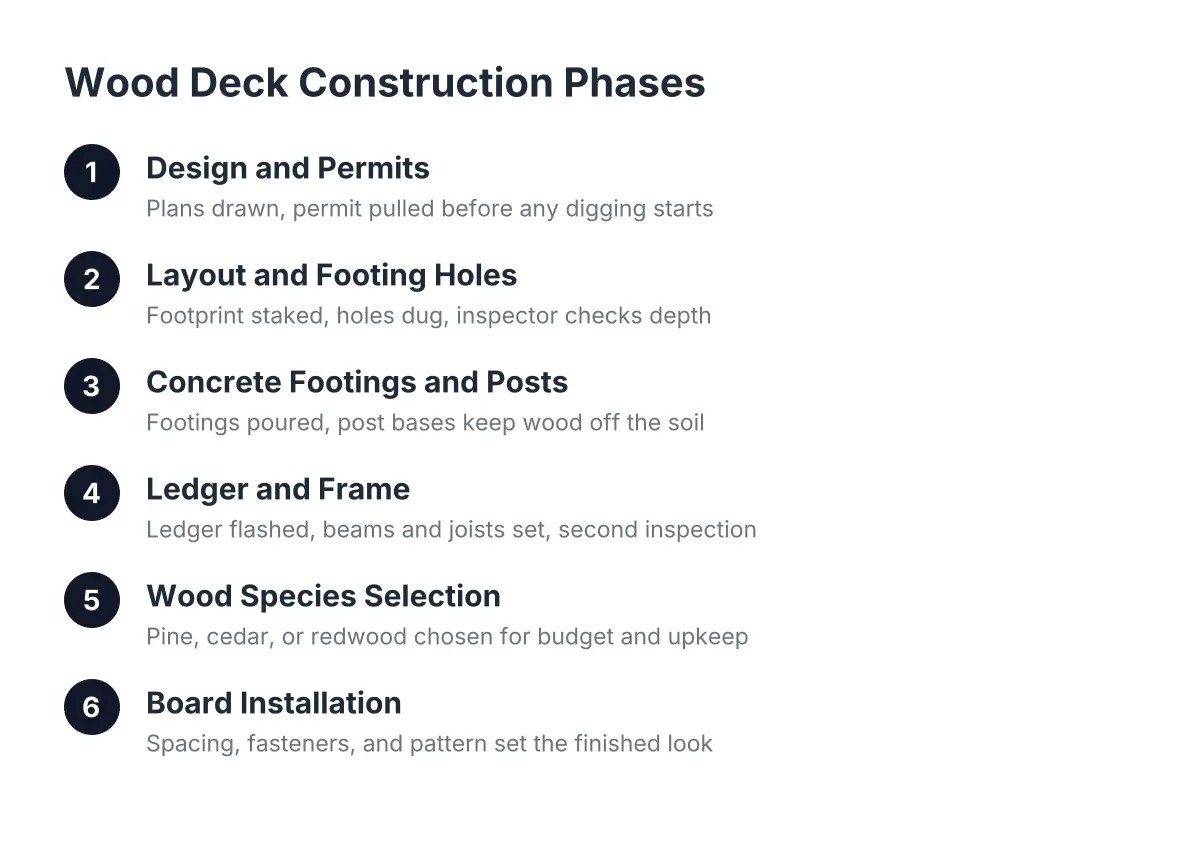
1. Design and Permits Come Before Any Digging
Every wood deck in Ontario, CA starts on paper, not in the yard. A deck builder measures your space, confirms how the deck attaches to the house or stands free, and draws plans that show footing locations, framing sizes, and railing heights. In San Bernardino County, most decks above a certain height off the ground need a building permit, and the city reviews those plans before work starts.
According to HomeAdvisor, a deck building permit typically costs between $230 and $500 depending on location, so budget for it rather than being surprised by it. A good local builder handles the permit paperwork and schedules the inspections for you. If a contractor suggests skipping the permit to save money, that is a red flag; an unpermitted deck can stall a home sale when the buyer's inspector asks for records.
2. Layout and Footing Holes Set the Whole Project
Once plans are approved, the crew marks the deck footprint with stakes and string lines, then digs footing holes at each post location. Footing depth and width come from the approved plans, not guesswork, because the footings carry the entire weight of the deck and everyone on it. In much of the Inland Empire, soil runs dense and dry, so digging is more about effort than mud.
Expect a city inspector to look at the open holes before any concrete goes in. This is the first inspection on most Ontario, California deck projects, and it exists to confirm the holes are deep and wide enough. Skipping or rushing this step is how decks end up settling unevenly a few summers later.
3. Concrete Footings and Posts Create the Foundation
With the holes approved, the crew pours concrete footings and sets post bases that hold the wood posts above the soil. Keeping the wood out of direct ground contact is a detail worth asking about; posts buried in dirt rot from the bottom up, and that rot hides until the deck starts to lean. Modern practice uses metal post bases anchored into the concrete so the lumber stays dry.
Concrete needs time to cure before it can carry load, so there is usually a pause of a few days here. For a freestanding deck, the footings do all the structural work. For an attached deck, the house ledger shares the load, which brings us to the next phase.
4. The Ledger and Frame Are Where Quality Shows
The ledger is the board bolted to your house that supports one side of an attached deck, and it is the single most common failure point on older decks nationwide. Proper flashing above the ledger keeps water from seeping behind it into your home's framing. Then the crew installs beams across the posts and runs joists between the beam and ledger, typically 16 inches apart for standard wood deck boards.
This framing phase is where a deck earns its lifespan. Joist hangers, hurricane ties, and proper fastener spacing are not glamorous, but they determine whether the structure stays rigid for decades. The North American Deck and Railing Association (NADRA) estimates that of the more than 60 million decks in the U.S., about 30 million are past their useful life; most of those failures trace back to framing and ledger problems, not the boards you walk on.
A second city inspection usually happens here, before anything covers the frame. The inspector checks connections, hardware, and spans against the approved plans.
5. Choosing Wood Species: Materials and Budget for Deck Ideas
Deck board installation is the phase most homeowners picture when they search for wood deck ideas, but the species choice happens earlier and shapes both cost and maintenance for years. In Southern California, three woods dominate residential deck construction:
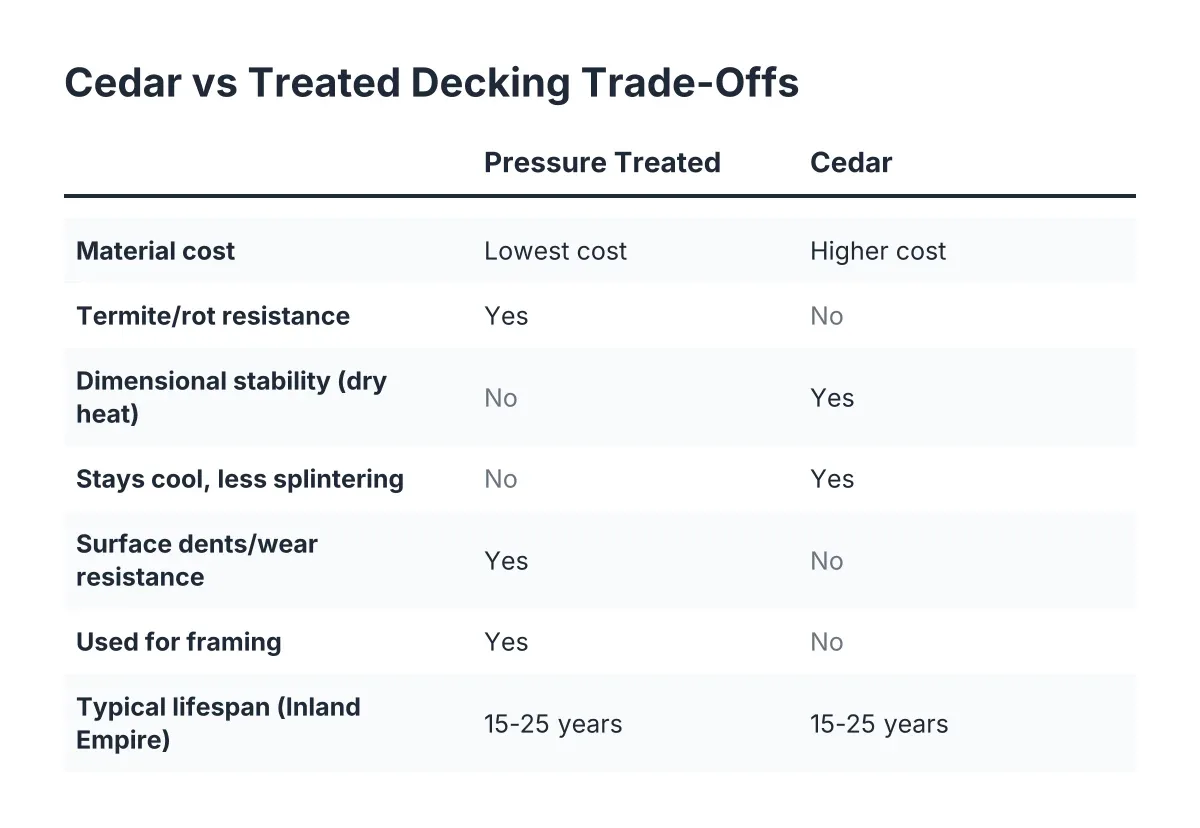
- Pressure treated pine is the budget option. It resists rot and insects because of the treatment, but it can warp or check in Inland Empire heat if it is not sealed within the first year.
- Cedar costs more and carries natural oils that resist decay. It stays cooler underfoot and takes stain well, but it is a softer wood that dents more easily.
- Redwood is the premium West Coast choice, naturally decay-resistant with rich color. It costs the most of the three, and heartwood grades perform far better outdoors than cheaper sapwood grades.
There is no single best wood deck material; there is the best material for your budget, sun exposure, and appetite for maintenance. Cedar vs pressure treated decking usually comes down to whether you will pay more upfront for less twisting and better looks, or save now and commit to diligent sealing. If low maintenance outranks natural wood for you, composite decking is worth pricing as a comparison; Angi puts professionally installed composite at $25 to $54 per square foot, which gives you a benchmark when you compare wood quotes.
6. Board Installation: Spacing, Fasteners, and Pattern
With the frame inspected, the crew installs the wood deck boards. Boards get a consistent gap between them, usually about the width of a nail, so water drains and the wood can expand and contract through Ontario's hot summers and cool winter nights. Fasteners matter here; coated screws rated for treated lumber resist the corrosion that plain fasteners suffer against treatment chemicals.
This is also where design choices from your wood deck ideas list become real. Running boards diagonally, adding a picture-frame border, or breaking a large surface into sections with pattern changes all happen during this phase. Diagonal and herringbone patterns add labor and material waste, so expect them to raise the price; a straight layout with a single border gives most backyards a custom look for modest extra cost. These details work on everything from a compact deck for the back of the house to a wraparound platform for an above ground pool.
7. Railings, Stairs, and the Final Inspection
Any deck more than 30 inches off the ground needs a code-compliant railing, and stairs need consistent rise and run so nobody trips. Deck railing installation happens after the surface is down, with posts anchored into the frame, not just the decking. Railings are also a design opportunity; horizontal cable or slim metal balusters keep sightlines open on small spaces, while matching wood pickets suit a traditional look.
After railings and stairs are complete, the city performs a final inspection and signs off on the project. That signed permit record matters more than most first-time planners realize. If you sell the home later, a documented, inspected deck is an asset; an undocumented one is a negotiation problem.
8. Staining and Sealing Lock In the Lifespan
New pressure treated lumber needs to dry before it accepts stain, often a few weeks to a few months depending on how wet the boards arrived. Once the wood is ready, a quality stain and sealer protects against the Inland Empire's intense UV exposure, which fades and dries out unprotected wood faster than rain ever will. Plan to reseal every two to three years as a general rule; your builder can give timing based on your deck's sun exposure.
Maintained well, a pressure treated wood deck commonly lasts 15 to 25 years, and cedar or redwood can match or beat that with consistent care. The investment tends to hold its value too. According to the National Association of Realtors' 2023 Remodeling Impact Report, homeowners recover 89% of the cost of a new wood deck through added home value, which is useful math whether you are staying put or listing within the year.
What the Full Timeline Looks Like
Suppose a homeowner in Rancho Cucamonga orders a 300 square foot attached pressure treated deck. In that illustrative scenario, a typical sequence runs like this: a week or two for design and permit review, a day for layout and footing holes, a pause for the footing inspection and concrete cure, two to four days of framing, another inspection, two to three days of board and railing installation, and a final inspection. Weather, inspection scheduling, and design complexity stretch or compress every one of those numbers, so treat any timeline in a quote as a plan, not a promise.
One honest limitation: this walkthrough covers a straightforward single-level deck. Elevated decks, multi-level designs, roofed structures, and slopes with questionable soil all add engineering steps that belong in a conversation with a licensed professional, not a checklist. The same goes for cost; an online free deck calculator gives a ballpark, but footing conditions, access, and species pricing in 2026 vary enough that only a site visit produces a number worth planning around.
Transforming Wood Deck Ideas Into a Build Plan
The gap between a saved photo and a finished deck is these eight phases. When you talk to a deck builder in Ontario, CA, ask how they handle each one: who pulls the permit, what footing hardware they use, how they flash the ledger, and which fasteners go into the boards. A builder who does wood deck construction daily will answer those questions without hesitation, and the answers will tell you more than any gallery of finished projects ever could.
If you need custom deck design, Inland Empire Decks can help.
Prefer to talk it through? Call (909) 298-8578 — a quick call is usually the fastest way to get a straight answer for your situation.